
Advances in Prosthodontics Spring 2026
New Findings & Best Practices for Cosmetic & Restorative Dentistry
Do You Have a Patient with Terminal Dentition?
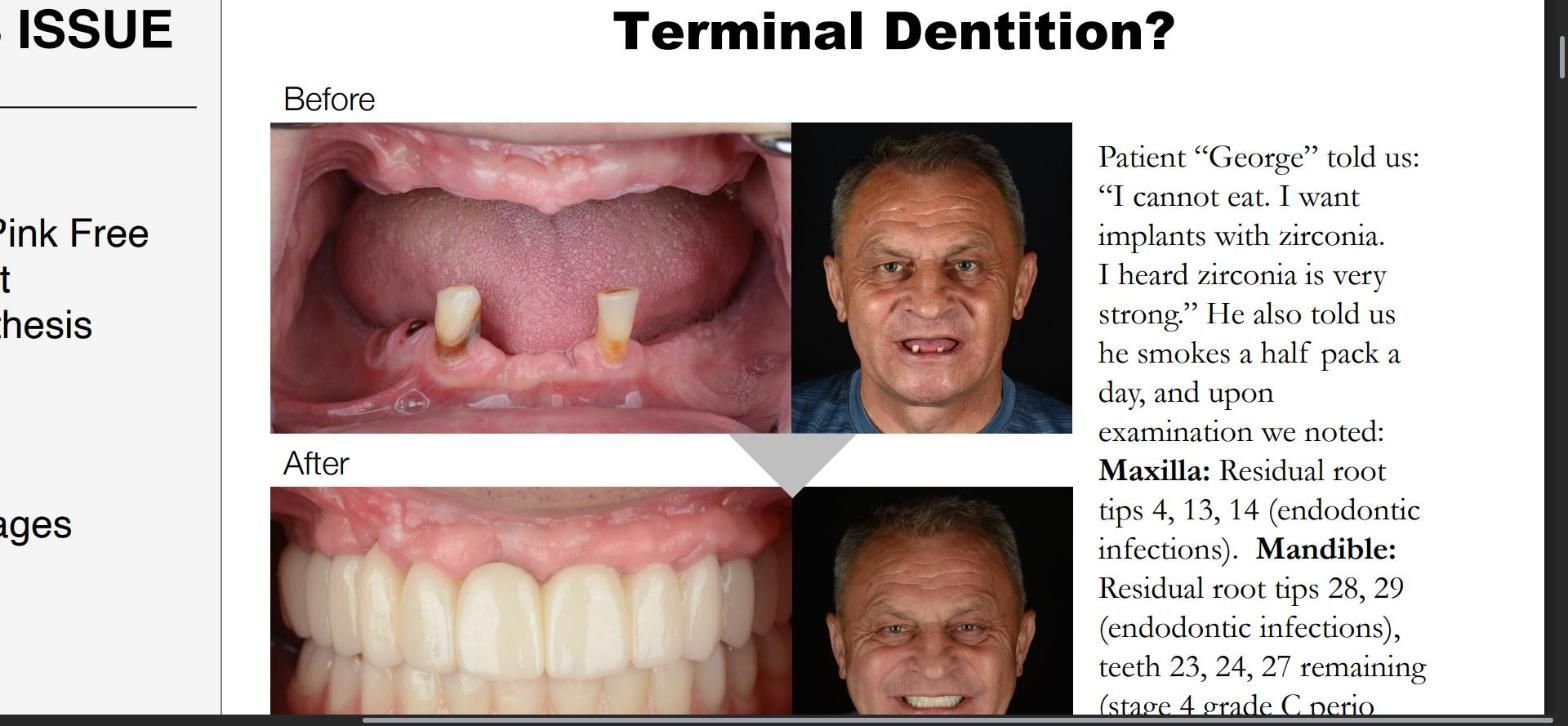
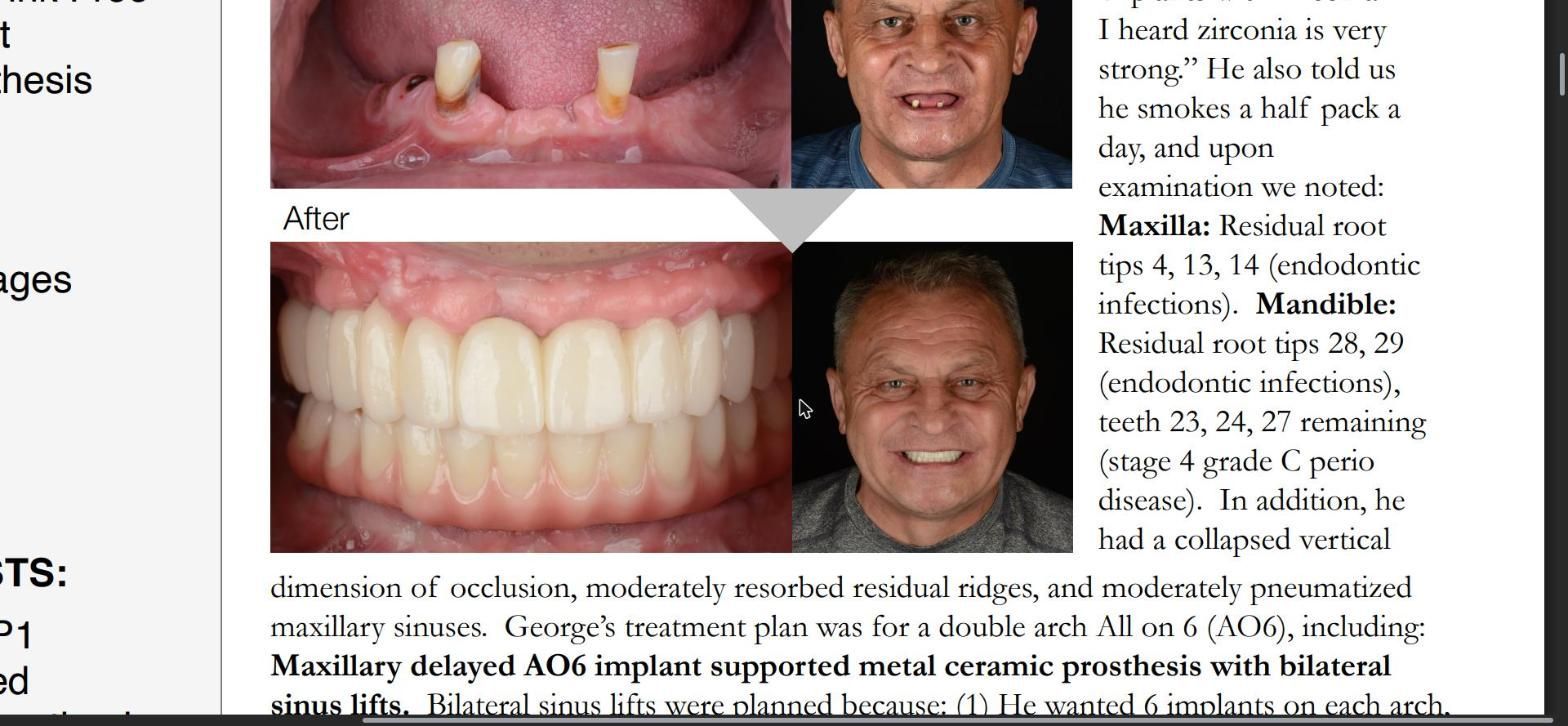
Case Summary: FP1 over FP3, Pink Free Full Arch Implant Supported Prosthesis
by Don Kim, DDS, MS, et al. Prosthodontist at MADE Dental Implant & Prosthodontics Center
Inside this issue
- Case Summary: FP1 over FP3, Pink Free Full Arch Implant Supported Prosthesis. Background, Treatment Stages and Final Result.
- Tips from the Prosthodontists: 6 keys for the FP1 implant supported metal ceramic prosthesis.
- Complex Cases: Dr. Pallotto & Dr. Kim each have specialized training and skill that helps patients in these situations.
Background
Patient “George” told us: “I cannot eat. I want implants with zirconia. I heard zirconia is very strong.” He also told us he smokes a half pack a day, and upon examination we noted:
- Maxilla: residual root tips 4, 13, 14 (endodontic infections).
- Mandible: residual root tips 28, 29 (endodontic infections), teeth 23, 24, 27 remaining (stage 4 grade C perio disease).
- A collapsed vertical dimension of occlusion, moderately resorbed residual ridges, and moderately pneumatized maxillary sinuses.
George’s treatment plan was for a double arch All on 6 (AO6), including:
- Maxillary delayed AO6 implant supported metal ceramic prosthesis with bilateral sinus lifts. Bilateral sinus lifts were planned because: (1) he wanted 6 implants on each arch, and (2) sinus lifts are highly predictable for vertical bone augmentation, to provide enough bone quantity for a FP1 (pink free) prosthesis. A diagnostic teeth set up confirmed that, with the ideal incisal edge position, George would not need pink porcelain to restore proper tooth proportions of the prosthesis.
- Mandibular immediate AO6 implant supported metal ceramic prosthesis.
If you have a patient with several missing, broken or severely worn teeth, or periodontal disease, they may be a candidate for oral rehabilitation with the assistance of an advanced Prosthodontist.
Treatment Stages
Maxillary residual root extractions and bilateral external sinus lifts were completed. After 2 months of healing, border molded final impressions were taken, and wax rims were used to fabricate a maxillary complete trial denture and a mandibular partial trial denture set up. Esthetics (incisal edge position, smile curve/display), vertical dimension of occlusion, and phonetics were assessed with the trial dentures. Fiducial markers were then put on the trial dentures and a dual-scan CBCT was taken for implant planning. Immediate interim complete dentures were processed in pink fiber reinforced PMMA, and stackable mandibular surgical guides were fabricated by 3D printing through a P30 printer and Straumann surgical guide clear resin.
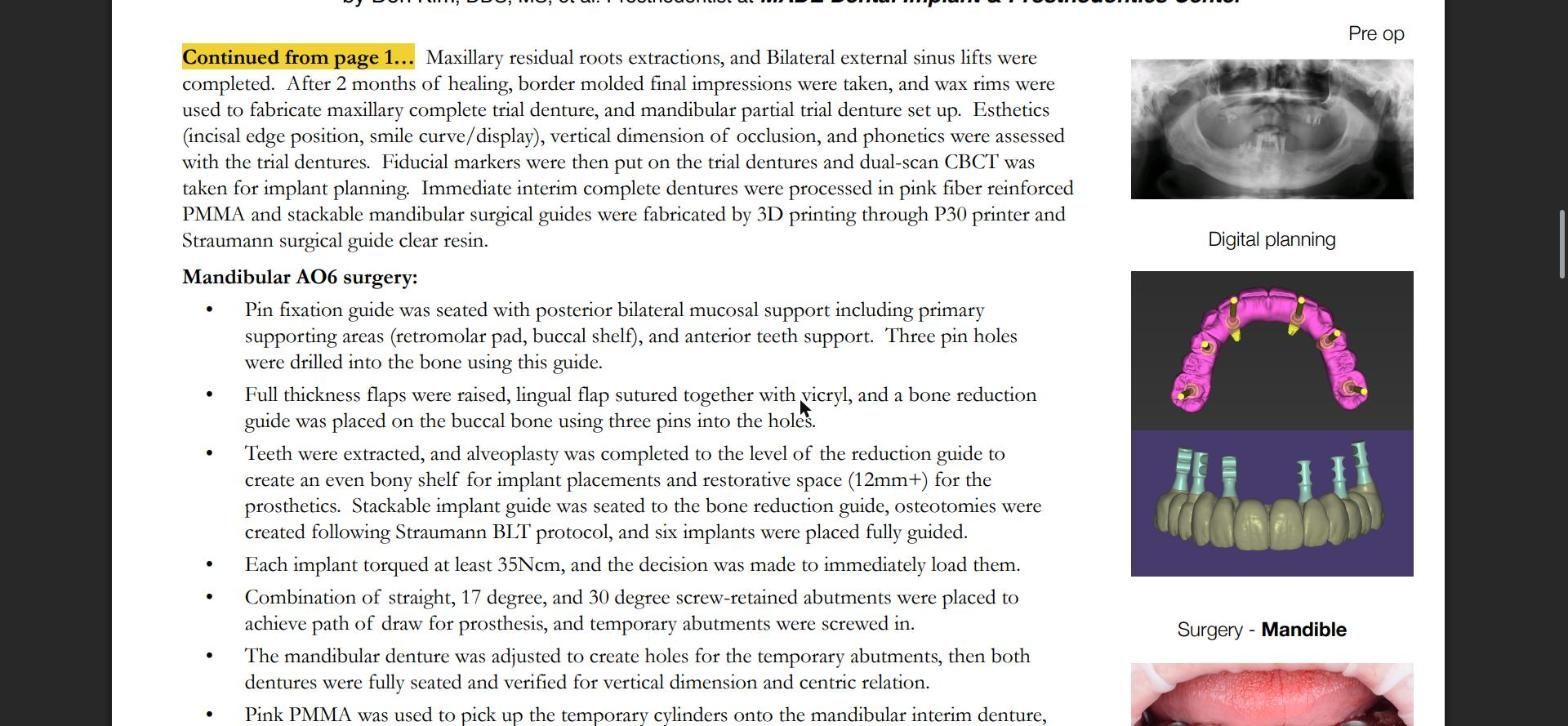
Mandibular AO6 surgery
- A pin fixation guide was seated with posterior bilateral mucosal support including primary supporting areas (retromolar pad, buccal shelf), and anterior teeth support. Three pin holes were drilled into the bone using this guide.
- Full thickness flaps were raised, the lingual flap was sutured together with Vicryl, and a bone reduction guide was placed on the buccal bone using three pins into the holes.
- Teeth were extracted, and alveoplasty was completed to the level of the reduction guide to create an even bony shelf for implant placements and restorative space (12mm+) for the prosthetics. A stackable implant guide was seated to the bone reduction guide, osteotomies were created following the Straumann BLT protocol, and six implants were placed fully guided.
- Each implant was torqued at least 35Ncm, and the decision was made to immediately load them.
- A combination of straight, 17 degree, and 30 degree screw-retained abutments were placed to achieve path of draw for the prosthesis, and temporary abutments were screwed in.
- The mandibular denture was adjusted to create holes for the temporary abutments, then both dentures were fully seated and verified for vertical dimension and centric relation.
- Pink PMMA was used to pick up the temporary cylinders onto the mandibular interim denture, and the interim denture was converted to an interim implant supported prosthesis and delivered to the patient at 10Ncm.
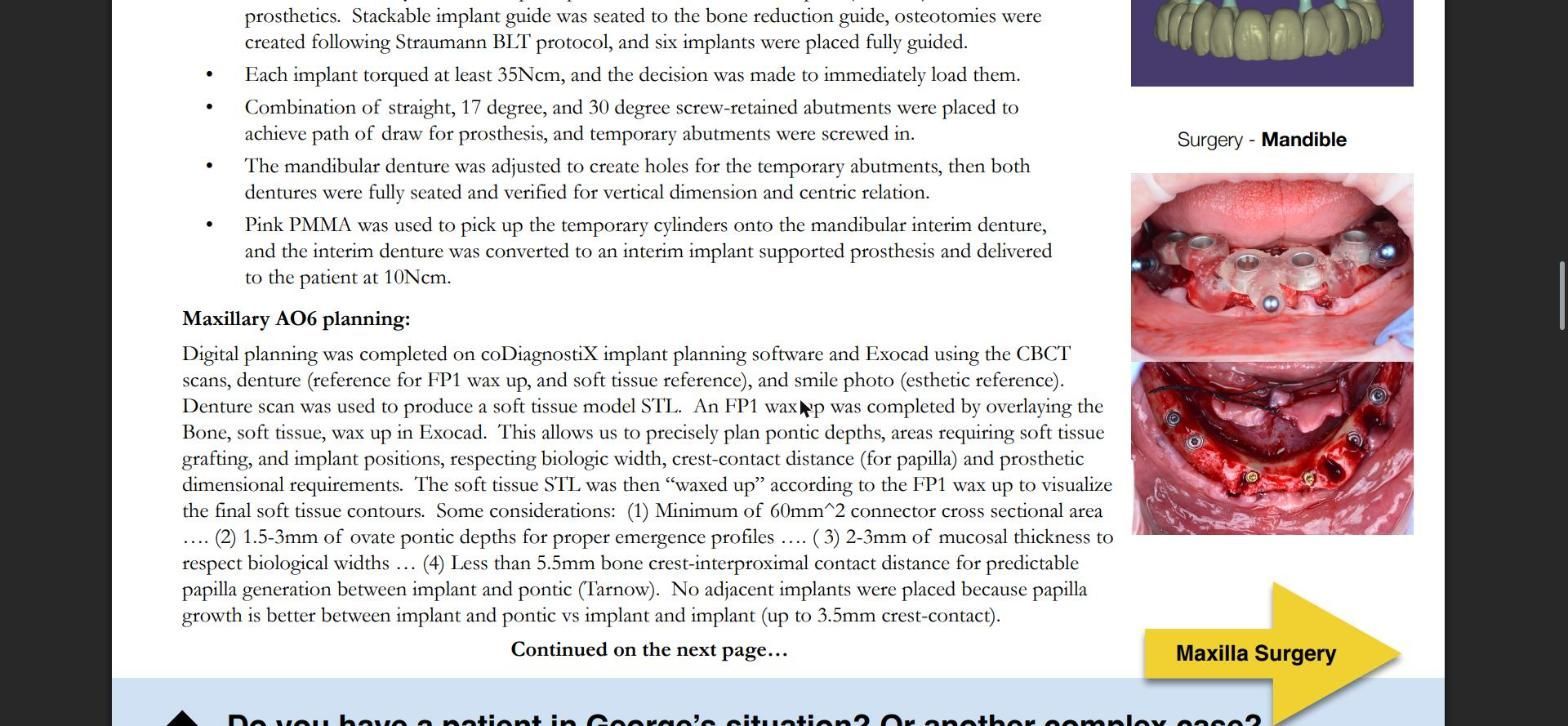
Maxillary AO6 planning
Digital planning was completed on coDiagnostiX implant planning software and Exocad using the CBCT scans, the denture (reference for the FP1 wax up and soft tissue reference), and a smile photo (esthetic reference). The denture scan was used to produce a soft tissue model STL. An FP1 wax up was completed by overlaying the bone, soft tissue and wax up in Exocad. This allows us to precisely plan pontic depths, areas requiring soft tissue grafting, and implant positions, respecting biologic width, crest-contact distance (for papilla) and prosthetic dimensional requirements. The soft tissue STL was then “waxed up” according to the FP1 wax up to visualize the final soft tissue contours.
Some considerations:
- Minimum of 60mm² connector cross sectional area.
- 1.5–3mm of ovate pontic depth for proper emergence profiles.
- 2–3mm of mucosal thickness to respect biological widths.
- Less than 5.5mm bone crest to interproximal contact distance for predictable papilla generation between implant and pontic (Tarnow).
No adjacent implants were placed because papilla growth is better between implant and pontic vs implant and implant (up to 3.5mm crest-contact).
Maxillary AO6 surgery
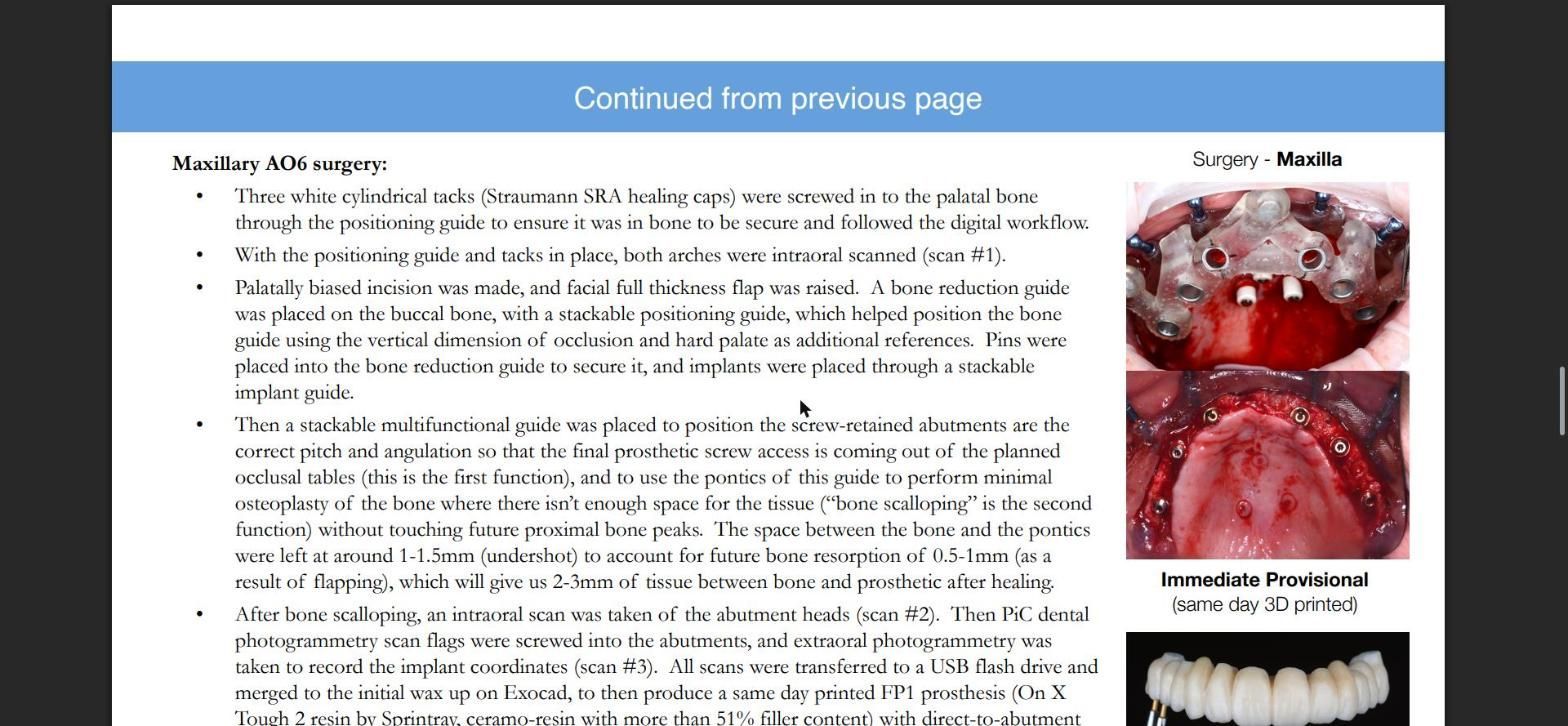
- Three white cylindrical tacks (Straumann SRA healing caps) were screwed into the palatal bone through the positioning guide to ensure it was in bone to be secure and followed the digital workflow.
- With the positioning guide and tacks in place, both arches were intraoral scanned (scan #1).
- A palatally biased incision was made, and a facial full thickness flap was raised. A bone reduction guide was placed on the buccal bone, with a stackable positioning guide, which helped position the bone guide using the vertical dimension of occlusion and hard palate as additional references. Pins were placed into the bone reduction guide to secure it, and implants were placed through a stackable implant guide.
- Then a stackable multifunctional guide was placed to position the screw-retained abutments at the correct pitch and angulation so that the final prosthetic screw access comes out of the planned occlusal tables (the first function), and to use the pontics of this guide to perform minimal osteoplasty of the bone where there isn’t enough space for the tissue (“bone scalloping” is the second function) without touching future proximal bone peaks. The space between the bone and the pontics was left at around 1–1.5mm (undershot) to account for future bone resorption of 0.5–1mm (as a result of flapping), which will give us 2–3mm of tissue between bone and prosthetic after healing.
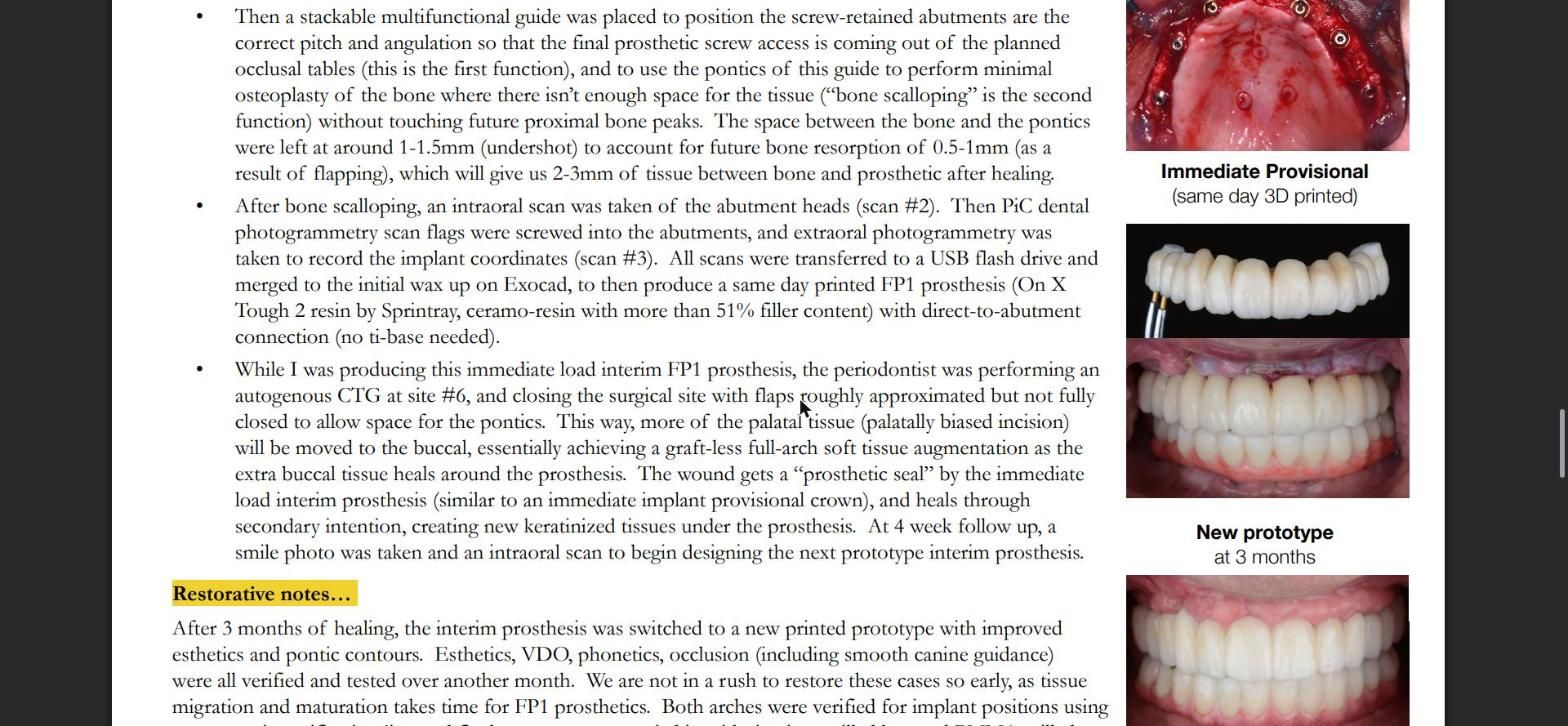
- After bone scalloping, an intraoral scan was taken of the abutment heads (scan #2). Then PiC dental photogrammetry scan flags were screwed into the abutments, and extraoral photogrammetry was taken to record the implant coordinates (scan #3). All scans were transferred to a USB flash drive and merged to the initial wax up on Exocad, to then produce a same day printed FP1 prosthesis (On X Tough 2 resin by Sprintray, ceramo-resin with more than 51% filler content) with direct-to-abutment connection (no ti-base needed).
- While the immediate load interim FP1 prosthesis was being produced, the periodontist performed an autogenous CTG at site #6, and closed the surgical site with flaps roughly approximated but not fully closed to allow space for the pontics. This way, more of the palatal tissue (palatally biased incision) is moved to the buccal, essentially achieving a graft-less full-arch soft tissue augmentation as the extra buccal tissue heals around the prosthesis. The wound gets a “prosthetic seal” from the immediate load interim prosthesis (similar to an immediate implant provisional crown), and heals through secondary intention, creating new keratinized tissue under the prosthesis. At the 4 week follow up, a smile photo was taken and an intraoral scan to begin designing the next prototype interim prosthesis.
Restorative notes
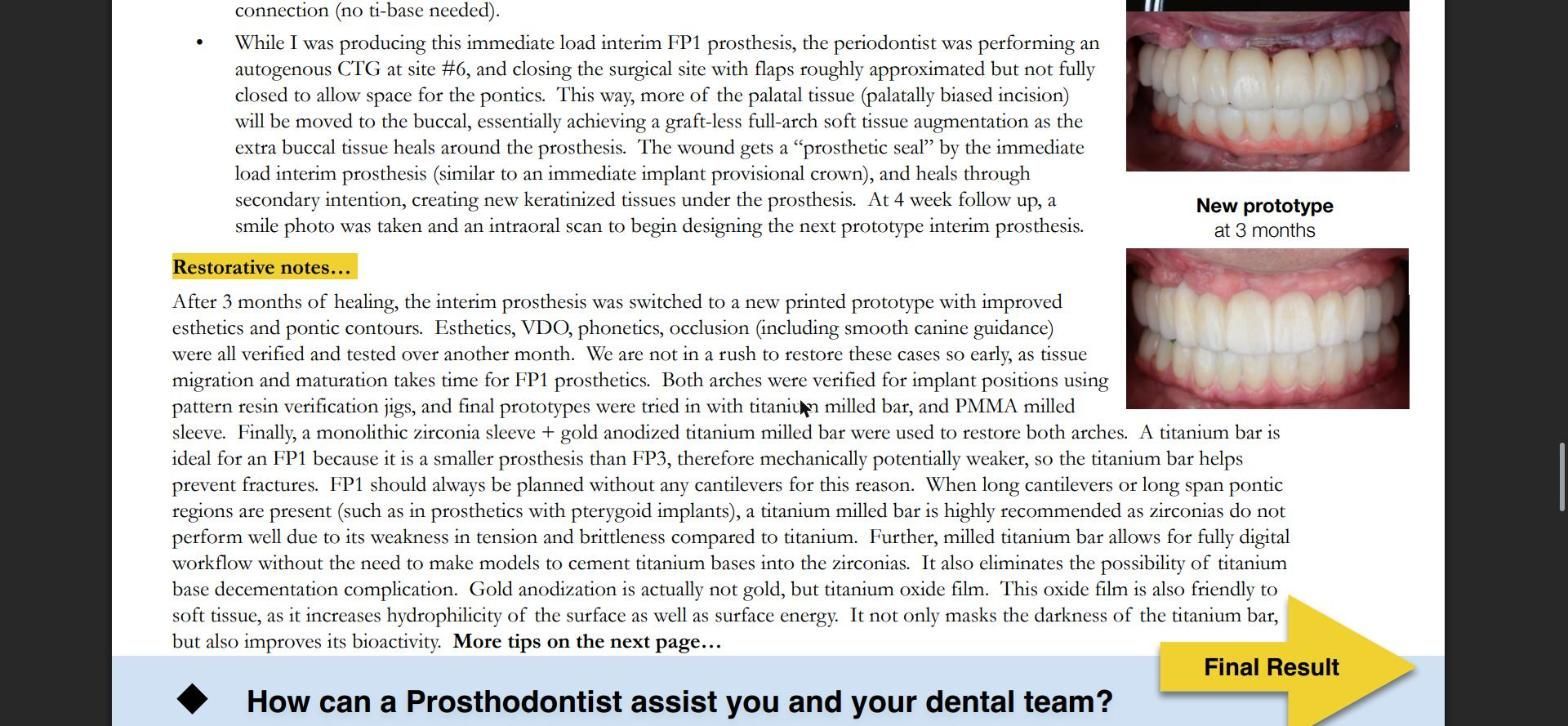
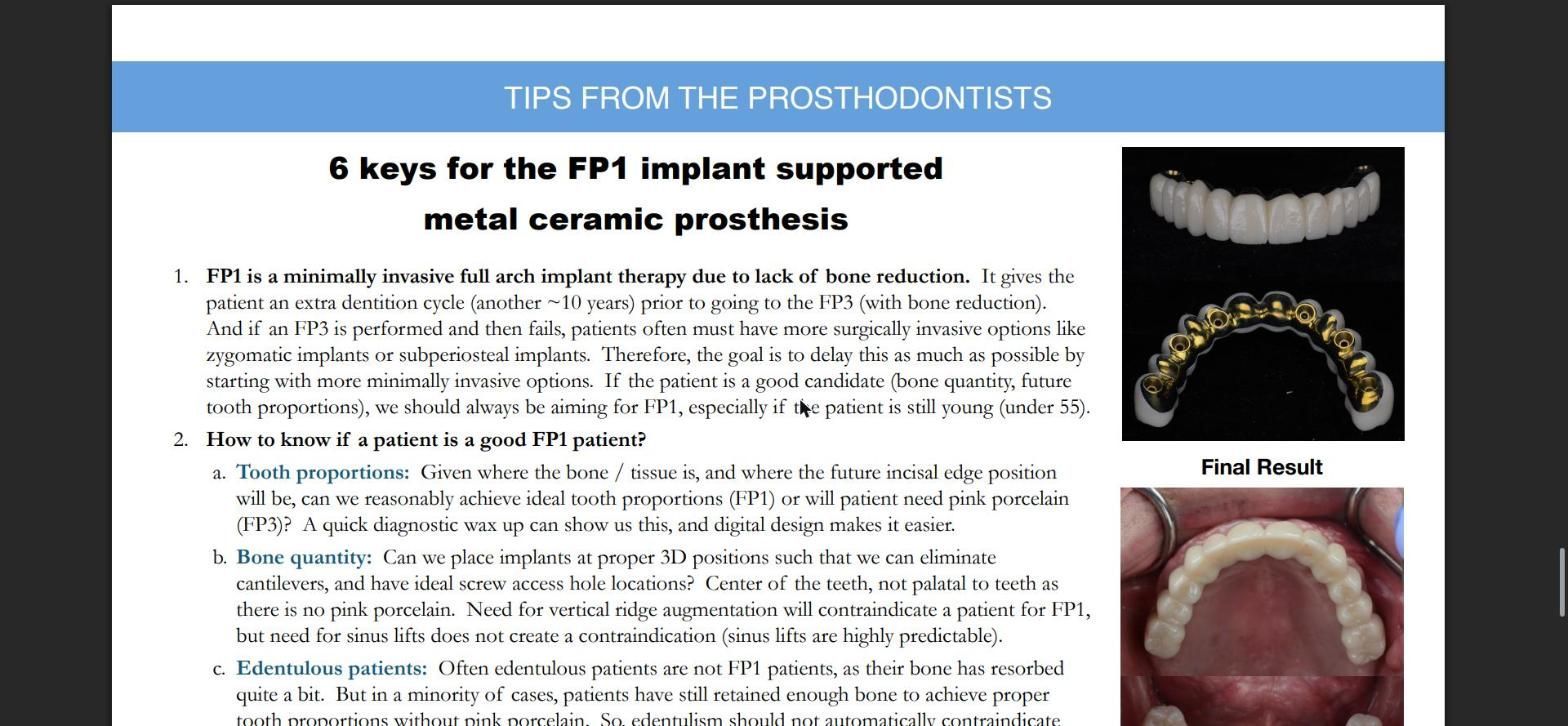
After 3 months of healing, the interim prosthesis was switched to a new printed prototype with improved esthetics and pontic contours. Esthetics, VDO, phonetics and occlusion (including smooth canine guidance) were all verified and tested over another month. We are not in a rush to restore these cases so early, as tissue migration and maturation takes time for FP1 prosthetics. Both arches were verified for implant positions using pattern resin verification jigs, and final prototypes were tried in with a titanium milled bar and a PMMA milled sleeve. Finally, a monolithic zirconia sleeve plus a gold anodized titanium milled bar were used to restore both arches.
A titanium bar is ideal for an FP1 because it is a smaller prosthesis than an FP3, therefore mechanically potentially weaker, so the titanium bar helps prevent fractures. FP1 should always be planned without any cantilevers for this reason. When long cantilevers or long span pontic regions are present (such as in prosthetics with pterygoid implants), a titanium milled bar is highly recommended, as zirconia does not perform well due to its weakness in tension and brittleness compared to titanium. Further, a milled titanium bar allows for a fully digital workflow without the need to make models to cement titanium bases into the zirconia. It also eliminates the possibility of titanium base decementation complications. Gold anodization is actually not gold, but a titanium oxide film. This oxide film is also friendly to soft tissue, as it increases hydrophilicity of the surface as well as surface energy. It not only masks the darkness of the titanium bar, but also improves its bioactivity.
Final Result
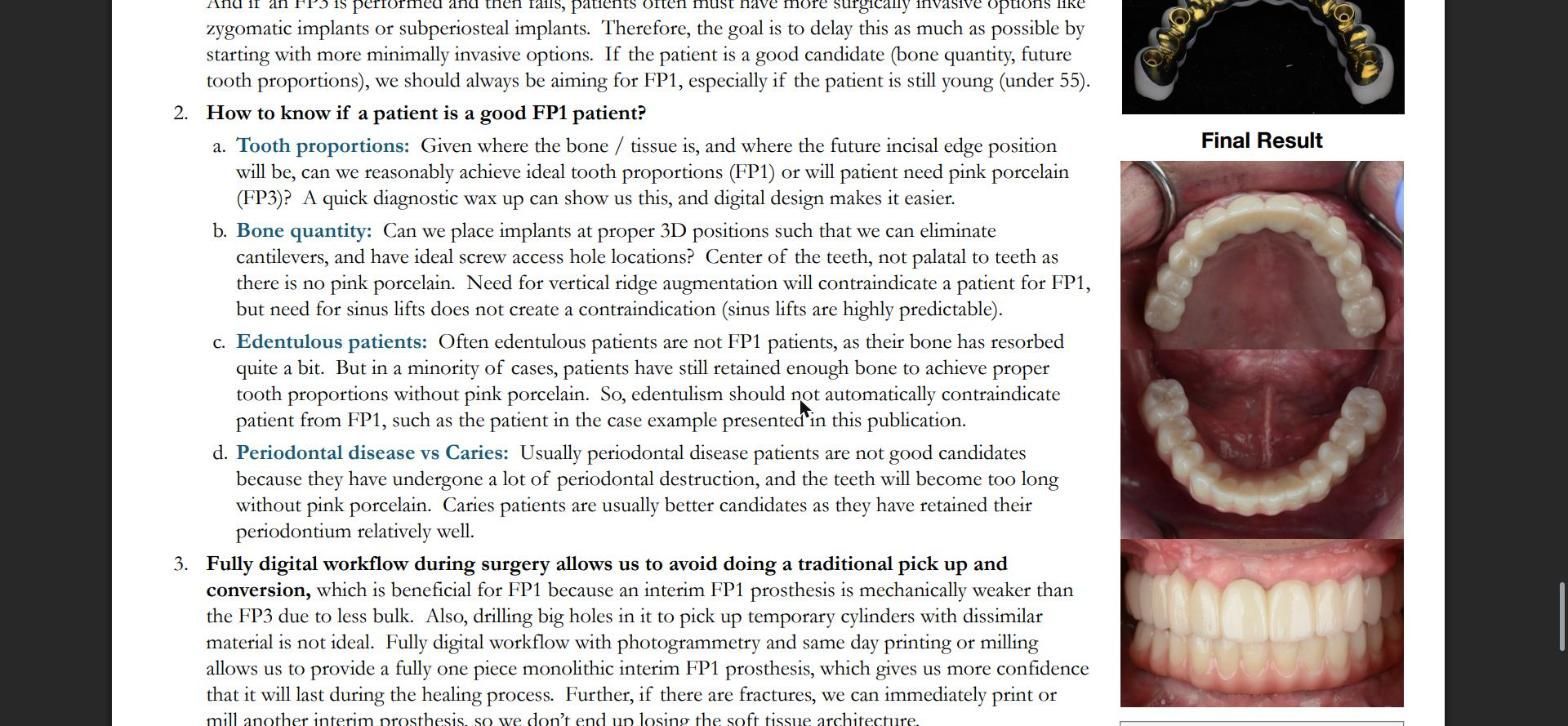
Tips from the Prosthodontists: 6 keys for the FP1 implant supported metal ceramic prosthesis
- FP1 is a minimally invasive full arch implant therapy due to lack of bone reduction. It gives the patient an extra dentition cycle (another ~10 years) prior to going to the FP3 (with bone reduction). And if an FP3 is performed and then fails, patients often must have more surgically invasive options like zygomatic implants or subperiosteal implants. Therefore, the goal is to delay this as much as possible by starting with more minimally invasive options. If the patient is a good candidate (bone quantity, future tooth proportions), we should always be aiming for FP1, especially if the patient is still young (under 55).
- How to know if a patient is a good FP1 patient?
- Tooth proportions: Given where the bone / tissue is, and where the future incisal edge position will be, can we reasonably achieve ideal tooth proportions (FP1) or will the patient need pink porcelain (FP3)? A quick diagnostic wax up can show us this, and digital design makes it easier.
- Bone quantity: Can we place implants at proper 3D positions such that we can eliminate cantilevers, and have ideal screw access hole locations? Center of the teeth, not palatal to teeth as there is no pink porcelain. Need for vertical ridge augmentation will contraindicate a patient for FP1, but need for sinus lifts does not create a contraindication (sinus lifts are highly predictable).
- Edentulous patients: Often edentulous patients are not FP1 patients, as their bone has resorbed quite a bit. But in a minority of cases, patients have still retained enough bone to achieve proper tooth proportions without pink porcelain. So, edentulism should not automatically contraindicate a patient from FP1, such as the patient in the case example presented in this publication.
- Periodontal disease vs caries: Usually periodontal disease patients are not good candidates because they have undergone a lot of periodontal destruction, and the teeth will become too long without pink porcelain. Caries patients are usually better candidates as they have retained their periodontium relatively well.
- Fully digital workflow during surgery allows us to avoid doing a traditional pick up and conversion, which is beneficial for FP1 because an interim FP1 prosthesis is mechanically weaker than the FP3 due to less bulk. Also, drilling big holes in it to pick up temporary cylinders with dissimilar material is not ideal. A fully digital workflow with photogrammetry and same day printing or milling allows us to provide a fully one piece monolithic interim FP1 prosthesis, which gives us more confidence that it will last during the healing process. Further, if there are fractures, we can immediately print or mill another interim prosthesis, so we don’t end up losing the soft tissue architecture.
- Guided surgery is crucial for FP1, as there is little to no room for error in 3D implant positions, whereas FP3 gives us more leeway with the pink porcelain.
- A titanium bar is beneficial for FP1, since it has added strength to resist fracture.
- Single implant biologic principles still apply to FP1, just in full arch (like crest-contact distance, palatal placement in the socket with gap grafting, prosthetic seal).
How Can a Prosthodontist Assist You and Your Dental Team?
We specialize in the treatment of complex cases, usually involving several procedures over months of care. The next time you see a challenging case, please feel free to call us and we can discuss treatment planning, or we can help you with any part of the treatment. Our goal is to be a resource for your office by helping manage difficult and time-consuming procedures, restoring the function and esthetics that the patient desires, then referring them back to your office for their ongoing care.
Have you seen a patient in one of these situations?
These are the most common reasons why other dentists refer to a Prosthodontist:
- Failing Restorations: broken or worn prosthetics, or poorly-fitting dentures
- Implant Complications: mal-positioned or loose implants, or multiple systems
- Severe Wear: advanced attrition from grinding or erosion, and collapsed vertical
- Terminal Dentition: perio disease or neglect, requiring extractions and prosthetics
- Edentulous Problems: resorbed ridges or lack of bone, wanting a fixed solution
- Occlusal Issues: advanced mal-occlusion, jaw discrepancies, canted plane
- Challenging Esthetics: un-esthetic restorations, high smile line, high expectations
- Missing Anteriors: central incisors from trauma or laterals from genetics
Our Pledge
When your patient is referred:
- We will only treat what your patient needs.
- We will send you updates.
- We will be part of your team, not take over your patients.
Do you have a patient in George’s situation, or another complex case?
If you have a question about a case and want another opinion, give our office a call. Or, if there’s a case that you want to work together on, please see our referral information to learn more about what you and your patient can expect when referring to our specialty office. We will take great care of your patient and keep you informed. Dental professionals refer to us as The Complex Case Specialists™ because we perform complex cases every day.
There are many ways we can help each other by working together on complex cases and by sharing knowledge and experience. If you’d like to discuss a difficult procedure, or talk on the phone about how we can help each other, please call or email our office with specific days and times when you are available.
Call (219) 258-7076 Email info@smilesbymade.com
Drs. Pallotto & Kim, Prosthodontists · The Complex Case Specialists™ · See more examples of complex cases online at AdvancedProsthodontist.com
